 Written by: Madeline B.
Last updated: 20 May, 2025
|
|
This feature is currently available only to users located in the United States. |
Commerce is a simple and convenient way to receive payments from your clients.
Note: The first step before sending or creating any invoices is to connect your bank account; you can read about how to do that here.
Creating an invoice
1. In the left sidebar menu, click ![]() Commerce
CommerceInvoices.
2. Click Create Invoice in the upper right-hand corner.
A preview of the invoice will be generated on the right side of the screen, which you will customize from the left sidebar.


Tip: If you want to edit your business contact information that appears under From in the invoice preview, click Edit under Business information, make the edits, and click Save.

3. Click Add New Client, enter your client's name and email address, then click Save.
 Name and email address are required to send an invoice, while the other information fields are optional. After adding this client, you will be able to find them in your client list using the search box above Add new client.

Adding invoice details
1. Under Invoice details, choose the type of invoice you want to send:One-time, Recurring, or Proposal.

2. Click Add item.
-
To create a new invoice item, click
Add new item -
To use a previous invoice item, search or browse for an existing line item. Use the checkboxes to select the items you want to include.
-
Add as many line items as needed.

3. When finished, click Add item again to confirm your selections.
4. Edit your invoice email templates and/or the CC and BCC fields for your email. All emails can be customized to include specific information. A live preview appears on the right side of the screen so you can see your changes before sending.

Customizing Next steps
Next steps functionality helps you customize and control what happens after your client makes a payment.
1. Customize the Success message after the payment field.
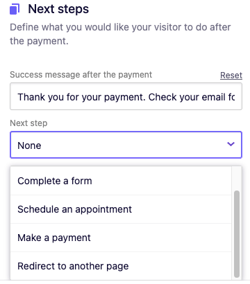
2. Select a Next step of your choosing. Here are the five options available in the dropdown.
- None - stay on the same page and only display the success message
-
Complete a form - go to the selected form
-
Schedule an appointment - go to the selected scheduling form
-
Make a payment - go the the selected checkout page. Note: This action is not recommended for this tool.
-
Redirect to another page - go to the specified section / page / URL / media
3. Make sure to provide next step details by specifying the target such as Add form / Add scheduling form / Add payment details / Add redirect.
- For this example, we will select
Schedule an appointmentsince this is a common next step after a client completes a payment. - Click
Add scheduling form. You can select your existing forms orAdd new form.

- Click
Save.
Sending your invoice
When you're ready to send the invoice to your client, click Send.
You're done! Your client will be able to click the View invoice button in the email and pay the invoice with a credit card, debit card, or ACH bank transfer.
You will receive a confirmation email when they have made the payment. After the payment has been processed (2-5 business days), you can initiate a payout to your bank account by following the steps in our Creating a payout article.
Setting up a recurring invoice
Using the B12 invoicing tool, you can also set up and send recurring invoices. To learn more about how to use a recurring invoice, you can view this article.
If you'd like to learn more about the B12 invoicing tool, you can take a look at our Getting Started article.