---
title: Adjusting images with Visual edit
description: Learn how to edit images in B12 3.0.
---
[Skip to content](https://support.b12.io/en/v3/editing-images#main-content)

- [Help Center](https://support.b12.io/)
- [B12 Website](https://www.b12.io/)
- [AI Website Prompts](https://www.b12.io/ai-website-prompt-gallery)
- [Resources](https://www.b12.io/resource-center/)
- [Pricing](https://www.b12.io/pricing/)
- [Log in](https://b12.io/dashboard/)
Open main navigation
Close main navigation
- [Help Center](https://support.b12.io/)
- [B12 Website](https://www.b12.io/)
- [AI Website Prompts](https://www.b12.io/ai-website-prompt-gallery)
- [Resources](https://www.b12.io/resource-center/)
- [Pricing](https://www.b12.io/pricing/)
- [Log in](https://b12.io/dashboard/)
- [Start for free](https://b12.io/signup/)
[Start for free](https://b12.io/signup/)
How can we help?
- There are no suggestions because the search field is empty.
1. [B12 Help Center](https://support.b12.io/en?hsLang=en)
2. [Built-in features](https://support.b12.io/en/built-in-features?hsLang=en)
3. [Visual edit](https://support.b12.io/en/built-in-features?hsLang=en#visual-edit)
# Adjusting images with Visual edit
## Learn how to remove backgrounds, crop, rotate, filter, and AI-edit images using B12's built-in image editor.
|  Written by: Jay D. Last updated: 18 Aug., 2026 |
| --- |
You can edit images directly within B12 using built-in tools to crop, adjust orientation, apply filters, and add metadata like alt text.
The image editor is organized into five sections: **Background removal**, **Orientation** (rotate and flip), **Crop**, **AI image editor**, and **Filters**. You can use any of them on an image already on your website, then save your changes once.
### Editing an image
1. In the left sidebar, select `Visual edit`.
2. Click the image you want to edit. A settings panel appears in the left sidebar.
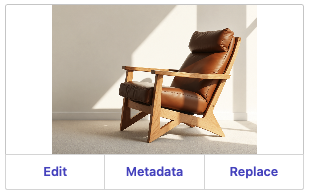
3. Click `Edit`.
4. Make your changes using the Orientation, Crop, or Filters sections, then click `Save`.
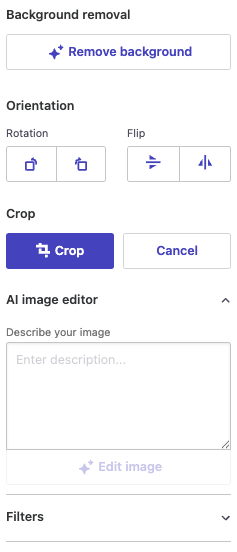
5. Click `Save` again to update your site with the new image.
**Note:** The Edit features (Background removal, Orientation (rotate and flip), Crop, AI image editor, and Filters) are not available on mobile.
### Removing a background
Background removal cuts your subject out of its background and leaves the rest transparent. Use it when you want a product, person, or logo to sit on a colored section without a visible box around it.
1. Toggle `Visual edit`on.
2. Click the image you want to change. The settings panel opens.
3. Click `Edit`.
4. Under **Background removal**, click `Remove background`.
5. Review the preview, then click `Save`.
**Note:** Removing a background uses [AI credits](https://support.b12.io/en/v3/ai-message-credits?hsLang=en). This feature is not available on mobile.
Background removal works in one click, you don't need to describe anything or select the subject yourself. It works best on images with a clear subject and good contrast against the background. Images with fine detail, such as hair or glass, may need a second attempt or a different source image.
**Tip:** A transparent image looks best on a solid background color. On a busy background image, the cut-out edges can be easier to notice.
### Cropping an image
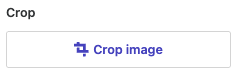
1. After opening the image editor (see above), select `Crop image`.
2. Select the area you would like to crop the image to on the right.
3. Once you have that selected, click `Crop`.
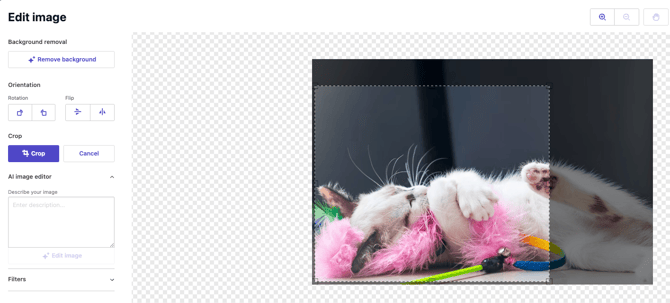
The cropped image will appear in the preview pane. Feel free to adjust cropping if needed.
4. Click `Save` to update your site.
**Note:** This feature is not available on mobile.
### Editing image metadata
1. In the left sidebar, select `Visual edit`.
2. Click the image you want to edit. A settings panel appears in the left sidebar.
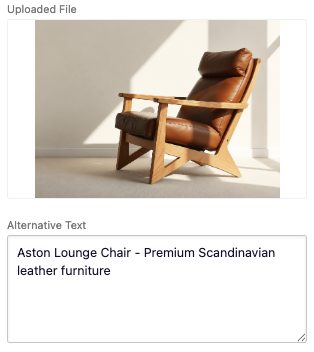
3. Click `Metadata`.
4. Enhance accessibility and SEO by adding Alternative (Alt) text, which describes the image for screen readers, then click `Save`.
### Replacing an image
1. In the left sidebar, select `Visual edit`.
2. Click the image you want to edit. A settings panel appears in the left sidebar.
3. Click `Replace`.
4. Choose one of the following options:
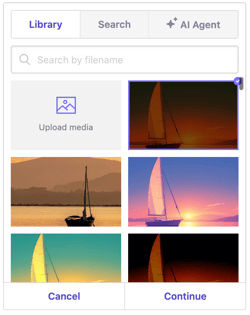
- **Library:** Choose an image you uploaded previously or upload a new image. To upload, click `Upload media`. Select your image, then click `Continue`. All uploaded files are stored in your Library for future use. Click `Save` to update.
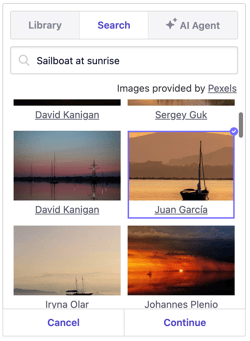
- **Search:** Use free, open-license images from **Pexels**. Type a keyword in the **Search free photos** field, select your image, then click `Continue`. Click `Save` to update.
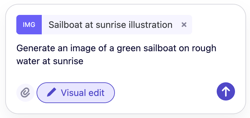
- **AI Agent:** Generate an AI image that fits your vision. Click **Ask AI Agent to generate an image**. Type a detailed description of your image, starting with **Generate an image of...** then click the up arrow . The AI Agent will automatically create a new image and replace the previous one.
**Note**: Generating an image with the AI Agent uses [AI credits](https://support.b12.io/en/ai-message-credits?hsLang=en).
### Applying filters
Filters change the look of an image without leaving B12.
1. After opening the image editor, expand the **Filters** menu.
2. Select the checkbox next to any filter you want to apply: Blend color, Blur, Exposure, Grayscale, Invert, Noise, Sepia, or Sharpen.
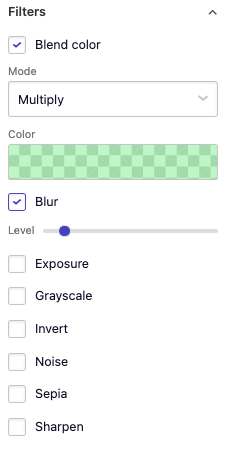
3. Some filters include extra settings. For example, **Blend color** lets you choose a blend mode and color, and **Blur** lets you set the intensity with a slider. Adjust these as needed.
4. Apply as many filters as you like and review the result in the preview.
5. Click `Save` to update your site.
**Note:** This feature is not available on mobile.
### Editing an image with AI
The AI image editor changes an image based on a description you write. Use it when you want to change what's *in* an image rather than how it's framed or colored. For example, removing an object, changing the time of day, or clearing clutter from a room.
1. In the left sidebar, toggle `Visual edit`.
2. Click the image you want to change, then click `Edit`.
3. Expand **AI image editor**.
4. In **Describe your image**, write the change you want in plain words. For example: "remove the car from the driveway" or "make it night."
5. Click `Edit image`.
6. Review the result, then click `Save`.
**Note:** Editing an image with AI uses [AI credits](https://support.b12.io/en/v3/ai-message-credits?hsLang=en). This feature is not available on mobile.
### Writing a good edit description
- Describe one change at a time. Several changes in a single description are less likely to come out as you expect.
- Name what you want changed and what you want kept: "remove the parked car, keep the building."
- If the result isn't right, edit your description and try again rather than adding to it.
### When the AI can't make an edit
Image editing models decline some requests. For example, edits that could be misleading or that involve a real person's likeness. B12 doesn't control which requests are declined, and the model can be cautious. When this happens, the image editor tells you that the edit wasn't made and that your original image remains unchanged. Try rewording your description to be more specific about the change, or use a different image.
### Undoing a change
Every change you make in the image editor is tracked until you save, so you can step back if a result isn't what you wanted.
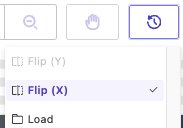
- Click the **Undo** or **Redo** buttonin the toolbar above the image to move one step at a time.

- Click the **History** button to see every change you've made, newest first. Select any step to return to it. **Load** is your original image.
- Click `Cancel` to close the editor without applying anything.
Once you click `Save`, your changes are applied to the image. To go back after saving, restore an earlier version of your website.
**Note:** This feature is not available on mobile.
- [Getting started](https://support.b12.io/en/getting-started?hsLang=en#main-content)
- [Introduction](https://support.b12.io/en/getting-started?hsLang=en#introduction)
- [Detailed guides](https://support.b12.io/en/getting-started?hsLang=en#detailed-guides)
- [Working with B12's AI Agent](https://support.b12.io/en/working-with-b12s-ai-agent?hsLang=en#main-content)
- [Agent Skills](https://support.b12.io/en/working-with-b12s-ai-agent?hsLang=en#agent-skills)
- [Built-in features](https://support.b12.io/en/built-in-features?hsLang=en#main-content)
- [Visual edit](https://support.b12.io/en/built-in-features?hsLang=en#visual-edit)
- [Code editor](https://support.b12.io/en/built-in-features?hsLang=en#code-editor)
- [Data & users (Backends)](https://support.b12.io/en/built-in-features?hsLang=en#data-users-backends)
- [Forms & submissions](https://support.b12.io/en/built-in-features?hsLang=en#forms-submissions)
- [Commerce](https://support.b12.io/en/built-in-features?hsLang=en#commerce)
- [Contact manager](https://support.b12.io/en/built-in-features?hsLang=en#contact-manager)
- [eSignatures](https://support.b12.io/en/built-in-features?hsLang=en#esignatures)
- [Email Marketing](https://support.b12.io/en/built-in-features?hsLang=en#email-marketing)
- [Team](https://support.b12.io/en/built-in-features?hsLang=en#team)
- [Analytics](https://support.b12.io/en/built-in-features?hsLang=en#analytics)
- [Website settings](https://support.b12.io/en/built-in-features?hsLang=en#website-settings)
- [Adding functionality](https://support.b12.io/en/adding-functionality?hsLang=en#main-content)
- [Third-party integrations](https://support.b12.io/en/adding-functionality?hsLang=en#third-party-integrations)
- [Publishing & growing](https://support.b12.io/en/publishing-growing?hsLang=en#main-content)
- [Domains](https://support.b12.io/en/publishing-growing?hsLang=en#domains)
- [Connecting your Domain](https://support.b12.io/en/publishing-growing?hsLang=en#connecting-your-domain)
- [Managing Your Domain](https://support.b12.io/en/publishing-growing?hsLang=en#managing-your-domain)
- [Email Forwarding & Sending](https://support.b12.io/en/publishing-growing?hsLang=en#email-forwarding-sending)
- [Growth & Marketing](https://support.b12.io/en/publishing-growing?hsLang=en#growth-marketing)
- [Troubleshooting](https://support.b12.io/en/troubleshooting?hsLang=en#main-content)
- [FAQs](https://support.b12.io/en/troubleshooting?hsLang=en#faqs)
- [Account & billing](https://support.b12.io/en/account-billing?hsLang=en#main-content)
- [Account Login & Password](https://support.b12.io/en/account-billing?hsLang=en#account-login-password)
- [Subscription & Payment Information](https://support.b12.io/en/account-billing?hsLang=en#subscription-payment-information)
- [Your Account](https://support.b12.io/en/account-billing?hsLang=en#your-account)
- [Managing Multiple Websites](https://support.b12.io/en/account-billing?hsLang=en#managing-multiple-websites)
- [Multi-user](https://support.b12.io/en/account-billing?hsLang=en#multi-user)
- [Getting support](https://support.b12.io/en/getting-support?hsLang=en#main-content)
- [Professional & Advanced Plan Support (B12 2.0)](https://support.b12.io/en/getting-support?hsLang=en#professional-advanced-plan-support-b12-2-0)
- [B12 2.0](https://support.b12.io/en/b12-2-0?hsLang=en#main-content)
- [Website Structure and Content](https://support.b12.io/en/b12-2-0?hsLang=en#website-structure-and-content)
- [Website Style & Design](https://support.b12.io/en/b12-2-0?hsLang=en#website-style-design)
- [Sitewide Settings](https://support.b12.io/en/b12-2-0?hsLang=en#sitewide-settings)
- [Using the B12 Editor](https://support.b12.io/en/b12-2-0?hsLang=en#using-the-b12-editor)
- [Analytics & SEO](https://support.b12.io/en/b12-2-0?hsLang=en#analytics-seo)
- [Integrations - General](https://support.b12.io/en/b12-2-0?hsLang=en#integrations-general)
- [Integrations - Communication](https://support.b12.io/en/b12-2-0?hsLang=en#integrations-communication)
- [Integrations - Language](https://support.b12.io/en/b12-2-0?hsLang=en#integrations-language)
- [Integrations - Ecommerce](https://support.b12.io/en/b12-2-0?hsLang=en#integrations-ecommerce)
- [Professional & Advanced Plan Features](https://support.b12.io/en/b12-2-0?hsLang=en#professional-advanced-plan-features)
- [Troubleshooting & Resources](https://support.b12.io/en/b12-2-0?hsLang=en#troubleshooting-resources)
- [Contact Forms](https://support.b12.io/en/b12-2-0?hsLang=en#contact-forms)
- [Online Scheduling](https://support.b12.io/en/b12-2-0?hsLang=en#online-scheduling)
- [Advanced Editing (Experts Only)](https://support.b12.io/en/b12-2-0?hsLang=en#advanced-editing-experts-only)
[](https://www.b12.io)
© 2025 B12. All rights reserved.
×