
|
Written by: Ronnel DG |

When your site has a database-backed feature, such as member sign-ins, saved listings, or stored form entries, the information behind that feature lives in a database. The Database area in Backends lets you open that database and work with the information in it directly, without asking the AI Agent. This article explains what a database holds, what you can view and change yourself, what still needs the AI Agent, and how to make changes safely.
Note: You'll only see data here if your site already has a database. The AI Agent creates one when you add a feature that needs it, such as member accounts or saved submissions. If you haven't added a feature like that yet, this area will be empty.
Understanding your database
A database is an organized store of information. It's made up of tables, and each table holds one kind of information, for example a table of members or a table of listings. Inside a table, every row is a single entry (one member, one listing), and every column is a detail that each entry shares (such as a name, an email address, or a price).
You can do the following yourself in the Database area:
- View every table in your database and the rows inside each one
- Add a new row to a table that already exists
- Edit the information in an existing row
- Remove a row you no longer need
A few things still need the AI Agent, because they change the structure of your database rather than the information in it:
- Creating a database
- Adding a new table
- Changing a table's structure, such as adding or renaming columns
The section What still needs the AI Agent below covers how to ask for those.
Opening your database
Your database lives in the Backends area of your site. To open it:
- Open the
Menuon the left. - Select
 Backends
 - Select
Database.

You'll see a card for each table in your database. Each card shows the table's name and how many rows it holds. A table with nothing in it yet shows a count of zero, and the heading above the cards tells you how many tables there are in total.
Database is one of six areas in Backends. The others are Users, Secrets, Edge functions, Logs, and Suggestions. Adding backend functionality covers the rest of them.
Note: If you are looking for the people who sign in to your site, they live in Users, not here. Use Users to add someone, deactivate them, verify an email address, or change your sign-in settings. A profiles table in your database usually holds extra details about those same people, such as a display name.
Viewing a table's records
Select a table's card to open it. The table's rows appear in a grid, with one column for each detail the table stores. A table of members, for example, might show an Id, an Email, and the dates the entry was created and last changed.

A few things to know about the grid:
- A counter such as
1–2 of 2sits above and below the table, with arrows for moving between pages when a table holds more rows than fit on one page. - If a table has more columns than fit on screen, scroll sideways to see the rest. The buttons for changing a row sit at the far right, so on a wide table you need to scroll right to reach them.
- A cell with nothing in it shows
NULL. - An empty table shows its column headings and the message
This table has no rows.
Adding, editing, and removing records
Once a table is open, you can change the information inside it. Take a moment to read the caution below before you make changes, because these edits affect your site's real data.
Caution: The information here is your site's live data. Adding, editing, or removing a row changes what your site shows or uses right away, and a removed row can't be brought back. Double-check your changes before you save, and copy anything important elsewhere before you delete it.
Adding a row
To add a new entry to a table:
- Open the table you want to add to.
- Select
Add rowat the top right. A panel opens on the left. - Fill in the fields. A red asterisk marks the ones you have to fill in, and
Savestays greyed out until all of them have a value. Date fields open a small calendar to pick from. - Select
Save. The new row appears in the table straight away.
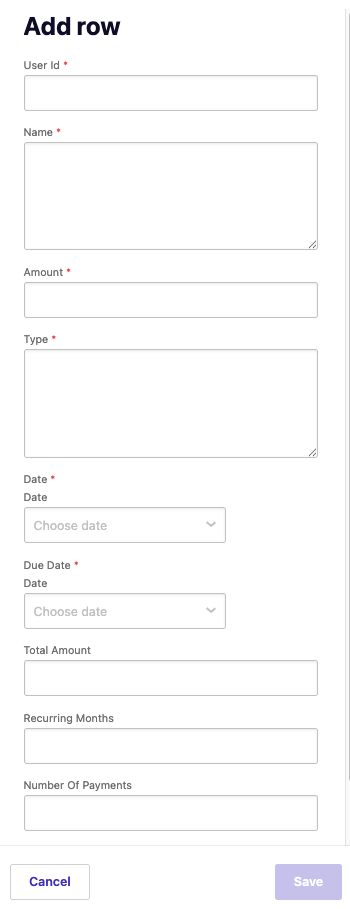
The panel only asks for the details you need to supply. Columns your database fills in on its own, such as an id it generates or the date a row was created, aren't shown.
Tip: Each value has to match the kind of information its column holds. If it doesn't, saving fails and the panel shows a technical message from the database rather than a plain-language one. This happens most often with an id column, which expects a long reference code rather than a name you type yourself. Copy the value you need from the table or the Users area it refers to.
Editing a row
To change the information in a row that already exists:
- Open the table and find the row you want to change.
- Point at the row. A pencil and a trash icon appear at the right-hand end of it.
- Select the pencil. A panel opens on the left with the row's current values filled in.
- Change what you need to, then select
Save.
The editing panel shows every column, including the dates your database keeps for when a row was created and last changed. You edit a row in this panel rather than typing into the grid itself.
Removing a row
To delete an entry you no longer need:
- Open the table and find the row you want to remove.
- Point at the row, then select the red trash icon at the right-hand end of it.
- A
Delete rowbox asks you to confirm, and warns that this cannot be undone. SelectDelete.
What still needs the AI Agent
The Database area is for working with the information inside your tables. Anything that changes the shape of the database itself is handled by the AI Agent. That includes creating a database, adding a new table, and changing which columns a table has. You don't need to know how any of it works behind the scenes; describe what you want in plain language, and the AI Agent makes the change.
For example, to add a new table, open the AI Agent chat and send a request like this:
Add a new table called [table name] to my database, with columns for [list the details you need, for example name, email, and sign-up date].
Once the AI Agent has created or changed a table, you can add and edit its rows yourself using the steps above.
Frequently asked questions
→ Do I need to publish my site after I change data here?
⇒ No. Changes to your data apply to your database directly, and your site uses them from that moment. Publishing pushes design and content changes to your live site, and it doesn't control the information in your tables.
→ Is this the same as my form submissions or the Contact manager?
⇒ No. Form submissions and the Contact manager hold people who contacted you through your site. The database here holds the information your database-backed features run on, such as member accounts or listings. They're separate places.
→ Can I create a new table from here?
⇒ Not from the Database area. Adding a table, or changing a table's columns, is done by the AI Agent. Ask for it in chat and the AI Agent will make the change for you.
→ Why does a table show a row count of zero?
⇒ The table exists but has no information in it yet. You can add rows yourself, or the feature that uses the table will fill it as people use your site.
→ Can I get back a row I removed?
⇒ No. The confirmation box tells you so before you delete: removing a row is permanent and cannot be undone. Copy anything important somewhere else first.
→ Can I download my table data to a spreadsheet?
⇒ No. There's currently no way to select rows or export a table from this area, so if you need a copy, you'll have to record the values yourself.
→ Is this where my site's members are managed?
⇒ Not quite. The people who sign in to your site are managed in Users, next to Database in Backends. That's where you add someone, deactivate them, or verify an email address. Your database may also hold a table with extra details about those same people, and that table is edited here.