|
Written by: Jay Douglas Last updated: 08 Jan., 2026 |

Properly setting up your Google Business Profile helps your business appear professional and legitimate in Google Search and Maps. It also unlocks tools like Google Ads, Google Reviews, and other features to grow your online presence.
Google Business Profile setup involves three steps:
1. Go to Google Business and click Start now.

2. Log in with your Google account. This account will be the Owner of the listing.
3. Search for your business name. If you don't find it, don't worry, that's supposed to happen! We're going to create it now. Go ahead and click the first option in the list with the label Create a business with this name.

4. Confirm your business name and click Next.
5. Select a business category and click Next.
6. You will be asked if you want to add a location for customers to visit.
-
If you have a physical "brick-and-mortar" location that customers can visit to transact business, select
Yesand clickNextto enter your business address on the next screen. -
If you go to customers' homes or offices to perform your services (such as HVAC, plumbing, landscaping, etc.), select
Noand clickNextto enter your Service areas.

Tip: You can add up to 20 service areas. Google’s location database includes neighborhoods, cities, and even entire countries. Keep in mind that your listing usually will not appear in searches more than 2 hours away from your verified address.
For example, a business in Oakland, California, is unlikely to show up in searches for Greater Los Angeles.

7. Pick the region in which your business is based.

8. Add your contact info:
-
Phone number
-
Website URL
-
use https:// (ex: https://www.mywebsite.com)
-
Tip: If you do not have a business phone, you can set up a free number with Google Voice.
9. Click Next.

10. Click Finish.
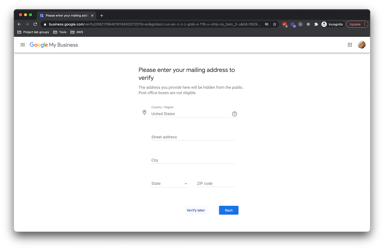
Important: If you entered service areas instead of a physical location, you must complete an extra step to verify your business. Enter a mailing address where Google can send your postcard with a verification code.
Delivery usually takes 5 days, but can take up to 2 weeks. If you have not received the postcard within 2 weeks, click here to contact the Google Business support team.
Optionally, you can skip this step and verify your business later, but we don't recommend this, because your business will need to be verified before it can appear in Google Search results pages or on Google Maps.
The address entered here will not be displayed to the public.

Optional: Choose whether or not to accept messages via Google My Business or skip.

11. Add a business description. This step is strongly recommended.

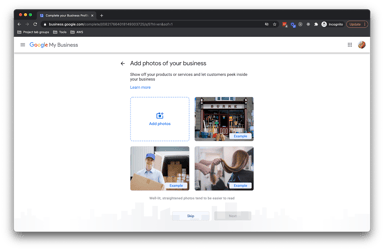
12. Add photos of your business.
-
Optionally, you can skip this step and add photos later.
-
This step is strongly recommended. According to a 2019 study published by Search Engine Land, business listings with at least 1 photo can usually expect up to 65% more clicks than an average listing, while listings with 100+ photos can usually expect over 1000% more clicks than an average listing.
13. Choose if you want to accept Google's offer of $100 in free Google Ads credits. For more info on Google Ads, click here.
Note: B12 does not provide services or support for Google Ads campaigns.

Continue to finish your profile setup.
Verifying a Google Business Profile listing
Once you receive a postcard from Google with your verification code, you can verify your Google Business Profile listing.
1. Log in to the Google Business Dashboard.
2. In the Pending verification box, click Enter verification code.

3. Enter the code from the postcard, then click Verify.

You should see a confirmation screen.

Tip: You can check the verification status of any Google Business Profile for which you are either an Owner or Manager at any time using this free tool: Check your verification status - Google Business Profile Help.
Connecting a Google Business Profile listing to B12 SEO Dashboard account
Follow the instructions in this support article: Fixing unconnected B12 SEO listings.