
Before you can set up email forwarding in B12, your domain must be connected and verified. Follow the steps below to complete your setup and create a custom forwarding address.
Connecting and verifying your domain
1. In the left sidebar menu, go to .![]() Domains
Domains
2. Under Domains, you’ll see one or more domains. Click the status indicator, which will say Connected and Not verified for email forwarding.

3. Under Edit Domain, click the checkbox that says Enable email forwarding for this domain.
4. Click Save changes and refresh button under Email domain setup.


5. Now click the status indicator again and scroll down to the Email domain setup card, which will say Not configured.

Updating your DNS Record
Next, you'll need to follow these steps to get your custom email address up and running:
1. Log in to your domain host.
2. Find the DNS settings for the domain you would like to use for your email forwarding address.
3. Add the following 4 records to your DNS settings:
Type: MX Host: @ Value: mxa.mailgun.org Priority: 10
Type: MX Host: @ Value: mxb.mailgun.org Priority: 10
Type: TXT Host: @ Value: v=spf1 include:mailgun.org ~all
Type: TXT Host: Use the "Name" field from the editor, removing everything after the second period Value: Use the "Value" field from the editor
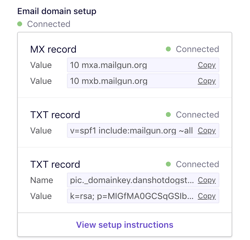
Note: It takes up to 48 hours for changes to your DNS settings to take effect. Once they do, the Email domain setup card will say Connected next to the MX record and TXT records.
After verification, you can create custom email forwarding addresses for this domain.