|
Written by: Meredith Last updated: 25 Dec., 2025 |
Your contact form is often the first point of interaction between you and your potential customers. Customizing it allows you to gather the exact information you need—whether that’s a service inquiry, appointment request, or specific business details.
This guide walks you through editing existing form fields, adding new ones, and setting what happens after a form is submitted.
Customizing contact form
1. In the B12 Editor, click the contact form you want to customize.
2. Click Form Details.

3. Edit the Title and Form cta text (the button label) as needed.

4. Under Form fields, you’ll see the existing fields. Click the ⌄ arrow beside a field to open its settings.

From here, you can:
-
-
Edit the field label and placeholder text.
-
Adjust field-specific settings such as field type, appointment type, required/not required, or contact property.
-
For multi-choice fields (like checkboxes or dropdowns), click Add new to add more options.
-

5. To add a new field, click Add field.

6. From the dropdown, select the type of field you want to add.

Available field types include:
-
-
-
- Address
- Checkboxes
- Date
- Date/Time
- File upload
- Invoice item
- Number
- Phone number
- Radio
- Select
- Services and products
- Text
- Textarea
- URL
-
-
The new field will appear at the bottom of your form by default. You can drag and drop to rearrange the order.
To remove a field, select it from the left sidebar, then click Remove field.

Next step
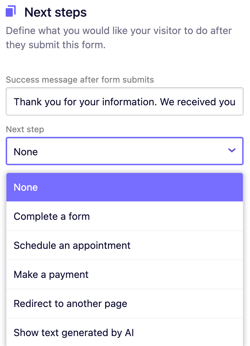
The Next steps functionality lets you control what happens after a visitor submits a form.
1. Scroll down to Next steps. Customize the Success message after submission field.

2. Under Next step, select one of the following actions:
-
None – Stay on the same page and show only the success message.
-
Complete a form – Redirects to another form.
Note: This action is not recommended for contact forms.
- Schedule an appointment – Opens a scheduling form.
-
Make a payment – Sends the visitor to a checkout page.
-
Redirect to another page – Takes the visitor to a specific page, section, URL, or media file.
-
Show text generated by AI – Displays AI-generated text to the visitor. You can use an existing prompt or create your own.
Note: You’ll need to provide your OpenAI API key to enable this option.