|
Written by: Madeline B. Last Updated: 08 Nov., 2025 |

Adding, adjusting, replacing, and removing images in the B12 Editor allows you to customize your website’s visual content easily. Follow the steps below to manage images within your website.
Adding an image
1. Log in to your B12 Editor.
2. In the left sidebar, click ![]() Website
Website![]() Pages
Pages
3. Select the section where you want to add an image, then scroll to:
-
Image for standard images
-
Background media for background images
-
Collection for collection items such as products, services, team members, blog posts, image galleries, video galleries, or testimonials
-
If the image is part of a collection, select the specific item first.
-
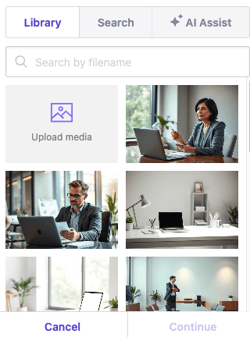
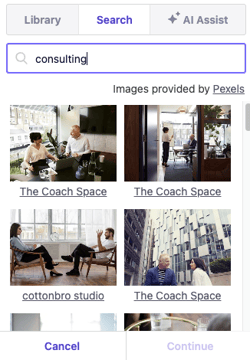
4. Choose one of the following options:
- Library: This lets you upload your own media. Click
Upload media, select your image, then clickContinue. Uploaded files are stored in your Library for future use.
- Search: Use free, open-license images from Pexels. Type a description in the Search free photos field, select your image, then click
Continue.
- AI Assist: This allows you to generate an AI image that fits your vision. Enter a description in the Image description field, choose a type and style, then click
Generate.
 After confirming, the photo will automatically be added. You can customize the look of your media by changing the section layout.
5. When you’re done customizing, click Publish in the upper-right corner to save your changes and update your live website.
Adjusting an image
1. Select the section where you want to adjust the image, then scroll to:
-
Image for standard images
-
Background media for background images
-
Collection for collection items such as products, services, team members, blog posts, image galleries, video galleries, or testimonials
-
If the image is part of a collection, select the specific item first.
-

2. Click Edit to open the image editing panel. You can crop, clip, rotate, or apply filters to adjust the image as needed.

3. When finished, click Save.
For more information on editing images, check this article.
4. When you’re done customizing, click Publish in the upper-right corner to save your changes and update your live website.
Replacing an image
1. Select the section where you want to add an image, then scroll to:
-
Image for standard images
-
Background media for background images
-
Collection for collection items such as products, services, team members, blog posts, image galleries, video galleries, or testimonials
-
If the image is part of a collection, select the specific item first.
-
2. Click Replace. The options Library, Search, and AI Assist will appear again.

3. Choose your preferred option, select your new media, then click Continue.
4. When you’re done customizing, click Publish in the upper-right corner to save your changes and update your live website.
Removing an image
1. Select the section where you want to add an image, then scroll to:
-
Image for standard images
-
Background media for background images
-
Collection for collection items such as products, services, team members, blog posts, image galleries, video galleries, or testimonials
-
If the image is part of a collection, select the specific item first.
-
2. The current image will appear. To remove it, click the ✖️ in the upper-right corner of the image. This removes the image immediately.

3. When you’re done customizing, click Publish in the upper-right corner to save your changes and update your live website.
Tip: To add a collection of images, add a Gallery page or section.